QSARtuna 𓆛: QSAR using Optimization for Hyperparameter Tuning (formerly Optuna AZ and QPTUNA)
Build predictive models for CompChem with hyperparameters optimized by Optuna.
Developed with Uncertainty Quantification and model explainability in mind.
Background
This library searches for the best ML algorithm and molecular descriptor for the given data.
The search itself is done using Optuna.
Developed models employ the latest state-of-the-art uncertainty estimation and explainability python packages
Further documentation in the GitHub pages here.
QSARtuna Publication available here.
The three-step process
QSARtuna is structured around three steps:
Hyperparameter Optimization: Train many models with different parameters using Optuna. Only the training dataset is used here. Training is usually done with cross-validation.
Build (Training): Pick the best model from Optimization, and optionally evaluate its performance on the test dataset.
“Prod-build:” Re-train the best-performing model on the merged training and test datasets. This step has a drawback that there is no data left to evaluate the resulting model, but it has a big benefit that this final model is trained on the all available data.
JSON-based Command-line interface
Let’s look at a trivial example of modelling molecular weight using a training set of 50 molecules.
Configuration file
We start with a configuration file in JSON format. It contains four main sections:
data - location of the data file, columns to use.
settings - details about the optimization run.
descriptors - which molecular descriptors to use.
algorithms - which ML algorithms to use.
Below is the example of such a file
{
  "task": "optimization",
  "data": {
    "training_dataset_file": "tests/data/DRD2/subset-50/train.csv",
    "input_column": "canonical",
    "response_column": "molwt"
  },
  "settings": {
    "mode": "regression",
    "cross_validation": 5,
    "direction": "maximize",
    "n_trials": 100,
    "n_startup_trials": 30
  },
  "descriptors": [
    {
      "name": "ECFP",
      "parameters": {
        "radius": 3,
        "nBits": 2048
      }
    },
    {
      "name": "MACCS_keys",
      "parameters": {}
    }
  ],
  "algorithms": [
    {
      "name": "RandomForestRegressor",
      "parameters": {
        "max_depth": {"low": 2, "high": 32},
        "n_estimators": {"low": 10, "high": 250},
        "max_features": ["auto"]
      }
    },
    {
      "name": "Ridge",
      "parameters": {
        "alpha": {"low": 0, "high": 2}
      }
    },
    {
      "name": "Lasso",
      "parameters": {
        "alpha": {"low": 0, "high": 2}
      }
    },
    {
      "name": "XGBRegressor",
      "parameters": {
        "max_depth": {"low": 2, "high": 32},
        "n_estimators": {"low": 3, "high": 100},
        "learning_rate": {"low": 0.1, "high": 0.1}
      }
    }
  ]
}
Data section specifies location of the dataset file.
In this example it specifies a relative path to the tests/data folder.
Settings section specifies that:
we are building a regression model,
we want to use 5-fold cross-validation,
we want to maximize the value of the objective function (maximization is the standard for scikit-learn models),
we want to have a total of 100 trials,
and the first 30 trials (”startup trials”) should be random exploration (to not get stuck early on in one local minimum).
We specify two descriptors and four algorithm, and optimization is free to pair any specified descriptor with any of the algorithms.
When we have our data and our configuration, it is time to start the optimization.
Run from Python/Jupyter Notebook
Create conda environment with Jupyter and Install QSARtuna there:
module purge
module load Miniconda3
conda create --name my_env_with_qsartuna python=3.11 jupyter pip # any python ^3.10
conda activate my_env_with_qsartuna
module purge  # Just in case.
which python  # Check. Should output path that contains "my_env_with_qsartuna".
python -m pip install https://github.com/MolecularAI/QSARtuna/releases/download/3.1.4/qsartuna-3.1.4.tar.gz
Then you can use QSARtuna inside your Notebook:
from qsartuna.three_step_opt_build_merge import (
    optimize,
    buildconfig_best,
    build_best,
    build_merged,
)
from qsartuna.config import ModelMode, OptimizationDirection
from qsartuna.config.optconfig import (
    OptimizationConfig,
    SVR,
    RandomForestRegressor,
    Ridge,
    Lasso,
    XGBRegressor,
)
from qsartuna.datareader import Dataset
from qsartuna.descriptors import ECFP, MACCS_keys, ECFP_counts, PathFP

# Prepare hyperparameter optimization configuration.
config = OptimizationConfig(
    data=Dataset(
        input_column="canonical",
        response_column="molwt",
        training_dataset_file="tests/data/DRD2/subset-50/train.csv",
    ),
    descriptors=[ECFP.new(), ECFP_counts.new(), MACCS_keys.new(), PathFP.new()],
    algorithms=[
        SVR.new(),
        RandomForestRegressor.new(),
        Ridge.new(),
        Lasso.new(),
        XGBRegressor.new(),
    ],
    settings=OptimizationConfig.Settings(
        mode=ModelMode.REGRESSION,
        cross_validation=3,
        n_trials=100,
        direction=OptimizationDirection.MAXIMIZATION,
    ),
)

# Run Optuna Study.
study = optimize(config, study_name="my_study")

# Get the best Trial from the Study and make a Build (Training) configuration for it.
buildconfig = buildconfig_best(study)
with open("best_config.txt", "w") as f:
    f.write(str(buildconfig.__dict__))

# Build (re-Train) and save the best model.
build_best(buildconfig, "target/best.pkl")

# Build (Train) and save the model on the merged train+test data.
build_merged(buildconfig, "target/merged.pkl")
Running via CLI
QSARtuna can be deployed directly from the CLI
To run commands QSARtuna uses the following syntax:
qsartuna-<optimize|build|predict|schemagen|automl|metadata|convert> <command>
We can run three-step-process from command line with the following command:
  qsartuna-optimize \
  --config examples/optimization/regression_drd2_50.json \
  --best-buildconfig-outpath ~/qsartuna-target/best.json \
  --best-model-outpath ~/qsartuna-target/best.pkl \
  --merged-model-outpath ~/qsartuna-target/merged.pkl
Optimization accepts the following command line arguments:
shell
qsartuna-optimize -h
usage: qsartuna-optimize [-h] --config CONFIG [--best-buildconfig-outpath BEST_BUILDCONFIG_OUTPATH] [--best-model-outpath BEST_MODEL_OUTPATH] [--merged-model-outpath MERGED_MODEL_OUTPATH] [--no-cache]

optbuild: Optimize hyper-parameters and build (train) the best model.

options:
  -h, --help            show this help message and exit
  --best-buildconfig-outpath BEST_BUILDCONFIG_OUTPATH
                        Path where to write Json of the best build configuration.
  --best-model-outpath BEST_MODEL_OUTPATH
                        Path where to write (persist) the best model.
  --merged-model-outpath MERGED_MODEL_OUTPATH
                        Path where to write (persist) the model trained on merged train+test data.
  --no-cache            Turn off descriptor generation caching

required named arguments:
  --config CONFIG       Path to input configuration file (JSON): either Optimization configuration, or Build (training) configuration.
Since optimization can be a long process, we should avoid running it on the login node, and we should submit it to the SLURM queue instead.
Submitting to SLURM
We can submit our script to the queue by giving sbatch the following script:
#!/bin/sh
#SBATCH --nodes=1
#SBATCH --ntasks=1
#SBATCH --cpus-per-task=5
#SBATCH --mem-per-cpu=4G
#SBATCH --time=100:0:0
#SBATCH --partition core

# This script illustrates how to run one configuration from QSARtuna examples.
# The example we use is in examples/optimization/regression_drd2_50.json.

module load Miniconda3
conda activate my_env_with_qsartuna

# The example we chose uses relative paths to data files, change directory.
cd /{project_folder}/

  /<your-project-dir>/qsartuna-optimize \
  --config {project_folder}/examples/optimization/regression_drd2_50.json \
  --best-buildconfig-outpath ~/qsartuna-target/best.json \
  --best-model-outpath ~/qsartuna-target/best.pkl \
  --merged-model-outpath ~/qsartuna-target/merged.pkl
When the script is complete, it will create pickled model files inside your home directory under ~/qsartuna-target/.
Using the model
When the model is built, run inference:
  qsartuna-predict \
  --model-file target/merged.pkl \
  --input-smiles-csv-file tests/data/DRD2/subset-50/test.csv \
  --input-smiles-csv-column "canonical" \
  --output-prediction-csv-file target/prediction.csv
Note that prediction accepts a variety of command line arguments:
 qsartuna-predict -h
usage: qsartuna-predict [-h] --model-file MODEL_FILE [--input-smiles-csv-file INPUT_SMILES_CSV_FILE] [--input-smiles-csv-column INPUT_SMILES_CSV_COLUMN] [--input-aux-column INPUT_AUX_COLUMN]
                        [--input-precomputed-file INPUT_PRECOMPUTED_FILE] [--input-precomputed-input-column INPUT_PRECOMPUTED_INPUT_COLUMN]
                        [--input-precomputed-response-column INPUT_PRECOMPUTED_RESPONSE_COLUMN] [--output-prediction-csv-column OUTPUT_PREDICTION_CSV_COLUMN]
                        [--output-prediction-csv-file OUTPUT_PREDICTION_CSV_FILE] [--predict-uncertainty] [--predict-explain] [--uncertainty_quantile UNCERTAINTY_QUANTILE]

Predict responses for a given OptunaAZ model

options:
  -h, --help            show this help message and exit
  --input-smiles-csv-file INPUT_SMILES_CSV_FILE
                        Name of input CSV file with Input SMILES
  --input-smiles-csv-column INPUT_SMILES_CSV_COLUMN
                        Column name of SMILES column in input CSV file
  --input-aux-column INPUT_AUX_COLUMN
                        Column name of auxiliary descriptors in input CSV file
  --input-precomputed-file INPUT_PRECOMPUTED_FILE
                        Filename of precomputed descriptors input CSV file
  --input-precomputed-input-column INPUT_PRECOMPUTED_INPUT_COLUMN
                        Column name of precomputed descriptors identifier
  --input-precomputed-response-column INPUT_PRECOMPUTED_RESPONSE_COLUMN
                        Column name of precomputed descriptors response column
  --output-prediction-csv-column OUTPUT_PREDICTION_CSV_COLUMN
                        Column name of prediction column in output CSV file
  --output-prediction-csv-file OUTPUT_PREDICTION_CSV_FILE
                        Name of output CSV file
  --predict-uncertainty
                        Predict with uncertainties (model must provide this functionality)
  --predict-explain     Predict with SHAP or ChemProp explainability
  --uncertainty_quantile UNCERTAINTY_QUANTILE
                        Apply uncertainty threshold to predictions

required named arguments:
  --model-file MODEL_FILE
                        Model file name
Optional: inspect
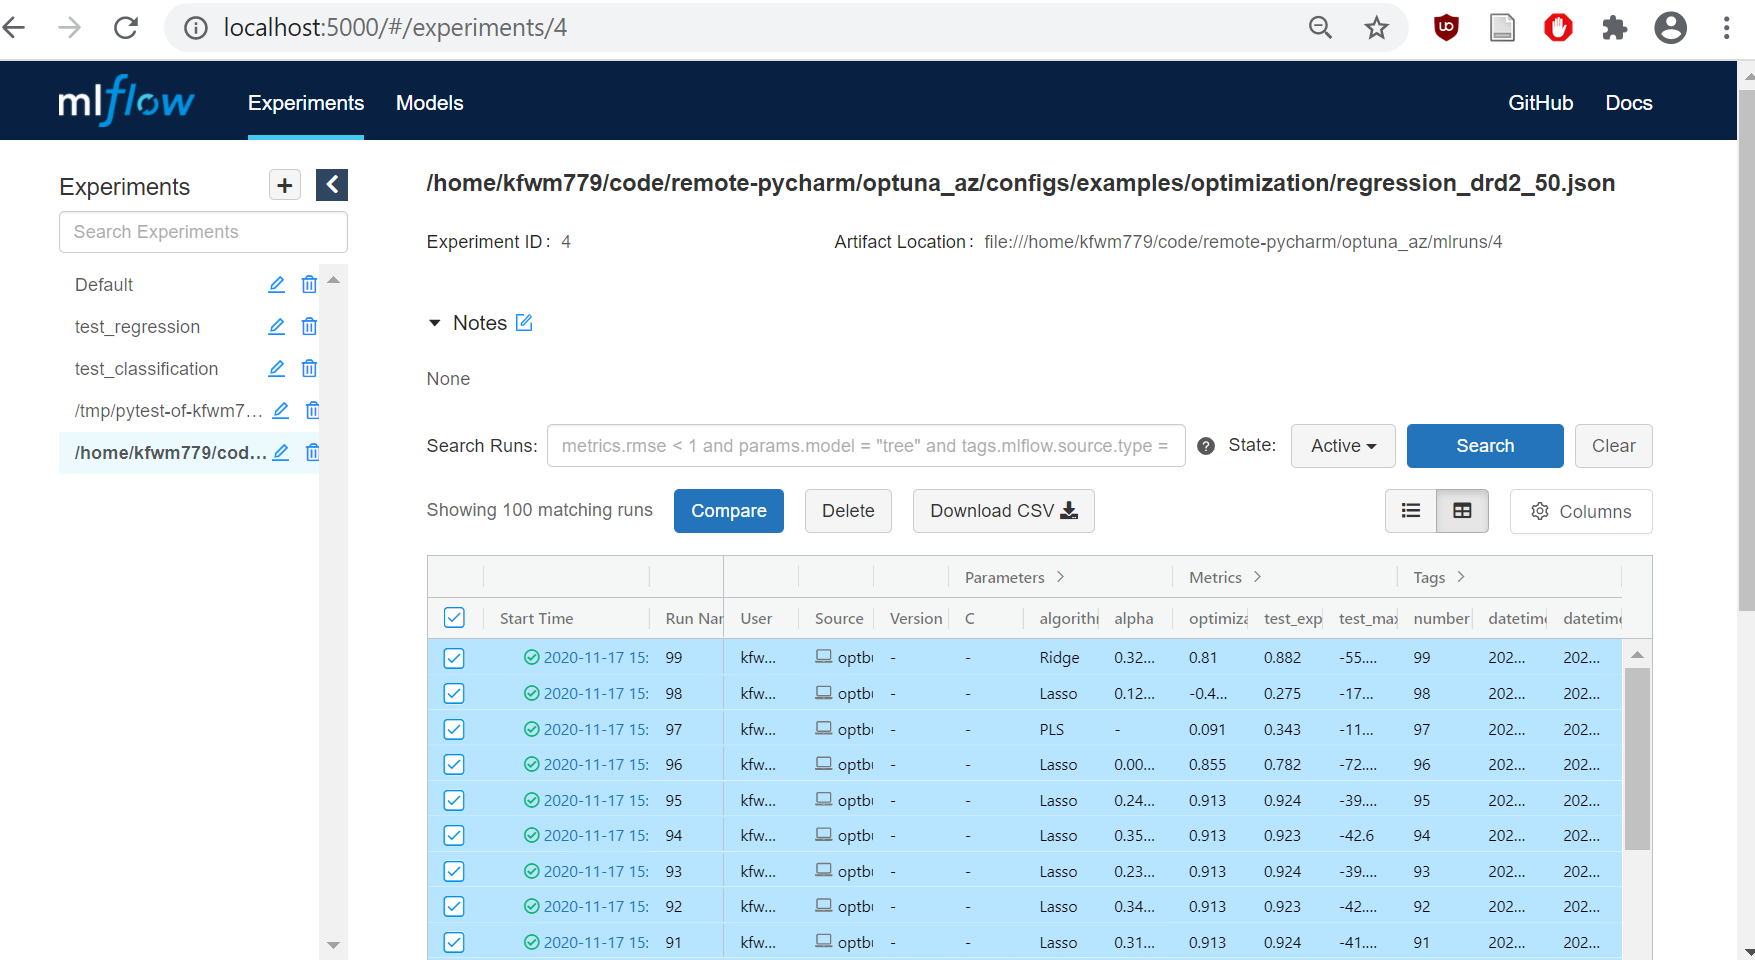
To inspect performance of different models tried during optimization, use MLFlow Tracking UI:
module load mlflow
mlflow ui
Then open mlflow link your browser.
If you run mlflow ui on SCP,
you can forward your mlflow port
with a separate SSH session started on your local (”non-SCP”) machine:
ssh -N -L localhost:5000:localhost:5000 user@login.intranet.net
(”-L” forwards ports, and “-N” just to not execute any commands).
In the MLFlow Tracking UI, select experiment to the left, it is named after the input file path. Then select all runs/trials in the experiment, and choose “Compare”. You will get a comparison page for selected runs/trials in the experiment.
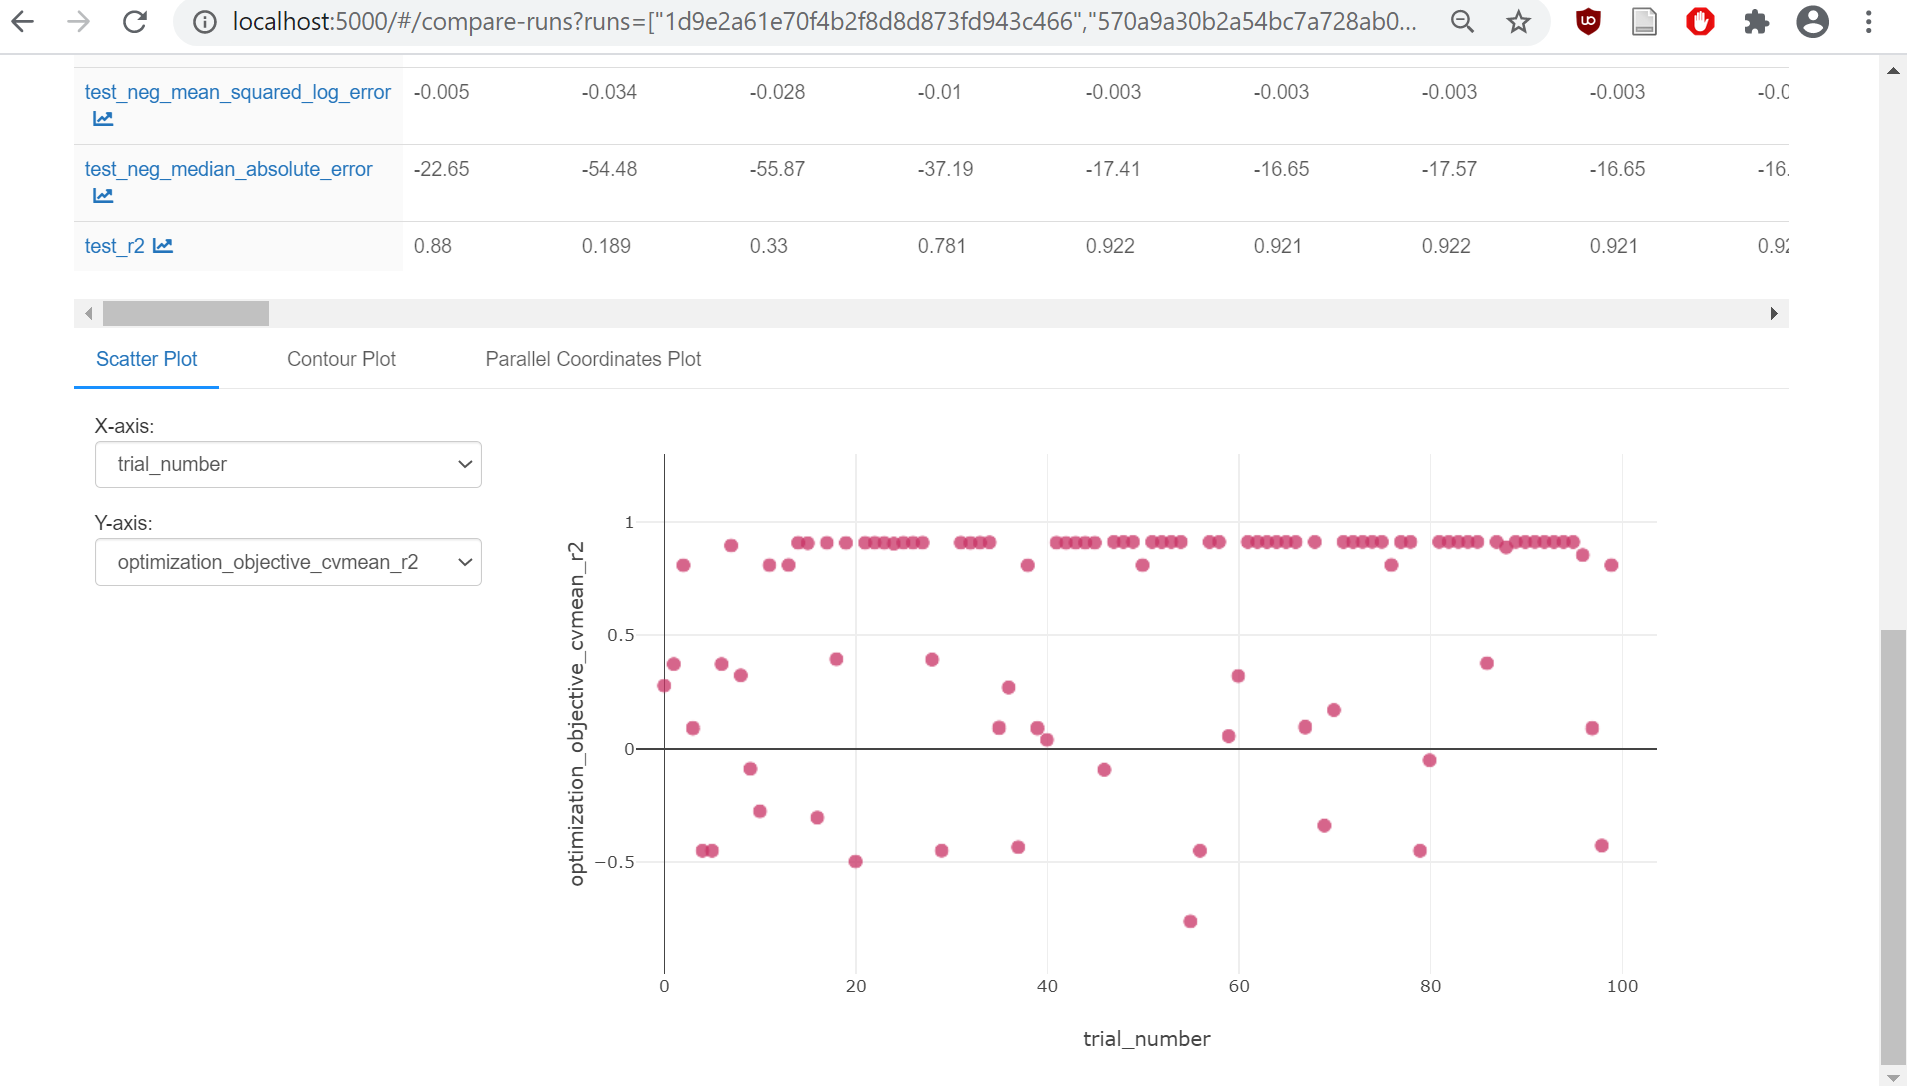
Comparison page will show MLFlow Runs (called Trials in Optuna), as well as their Parameters and Metrics. At the bottom there are plots. For X-axis, select “trial_number”. For Y-axis, start with “optimization_objective_cvmean_r2”.
You can get more details by clicking individual runs. There you can access run/trial build (training) configuration.
AutoML (Automatic Machine Learning)
QSARtuna has an AutoML daemon designed to automate the process of preparing and dispatching tasks for model training using a SLURM job scheduler. It’s particularly useful for data scientists and researchers who work with large datasets and need to train models using distributed computing resources. The code helps in streamlining the process of data preparation, model training, and managing the SLURM job submission, all while ensuring that the training process is efficient and scalable.
AutoML should be run from the QSARtuna environment as in the following, and accepts the following parameters:
module load Miniconda3
conda activate my_env_with_qsartuna
qsartuna-automl -h

usage: qsartuna-automl [-h] --output-path OUTPUT_PATH --email EMAIL --user_name USER_NAME --input-data INPUT_DATA --input-smiles-csv-column INPUT_SMILES_CSV_COLUMN --input-activity-csv-column
                     INPUT_ACTIVITY_CSV_COLUMN --input-task-csv-column INPUT_TASK_CSV_COLUMN --input-initial-template INPUT_INITIAL_TEMPLATE --input-retrain-template INPUT_RETRAIN_TEMPLATE
                     --input-slurm-template INPUT_SLURM_TEMPLATE [--quorum QUORUM] [--n-cores N_CORES] [--dry-run] [-v] [--slurm-req-cores SLURM_REQ_CORES] [--slurm-req-mem SLURM_REQ_MEM]
                     [--slurm-req-partition SLURM_REQ_PARTITION] --slurm-al-pool SLURM_AL_POOL --slurm-al-smiles-csv-column SLURM_AL_SMILES_CSV_COLUMN --slurm-job-prefix SLURM_JOB_PREFIX
                     [--slurm-failure-cores-increment SLURM_FAILURE_CORES_INCREMENT] [--slurm-failure-mem-increment SLURM_FAILURE_MEM_INCREMENT]
                     [--slurm-failure-mins-increment SLURM_FAILURE_MINS_INCREMENT] [--slurm-failure-max-retries SLURM_FAILURE_MAX_RETRIES] [--slurm-failure-max-mem SLURM_FAILURE_MAX_MEM]
                     [--slurm-failure-max-cpu SLURM_FAILURE_MAX_CPU] [--save-previous-models]

AutoML scheduling for temporal automatic retraining of models

options:
  -h, --help            show this help message and exit
  --quorum QUORUM
  --n-cores N_CORES
  --dry-run
  -v, --verbose
  --slurm-req-cores SLURM_REQ_CORES
  --slurm-req-mem SLURM_REQ_MEM
  --slurm-req-partition SLURM_REQ_PARTITION
  --slurm-failure-cores-increment SLURM_FAILURE_CORES_INCREMENT
  --slurm-failure-mem-increment SLURM_FAILURE_MEM_INCREMENT
  --slurm-failure-mins-increment SLURM_FAILURE_MINS_INCREMENT
  --slurm-failure-max-retries SLURM_FAILURE_MAX_RETRIES
  --slurm-failure-max-mem SLURM_FAILURE_MAX_MEM
  --slurm-failure-max-cpu SLURM_FAILURE_MAX_CPU
  --save-previous-models

required named arguments:
  --output-path OUTPUT_PATH
                        Path to the output AutoML directory
  --email EMAIL         Email for SLURM job notifications
  --user_name USER_NAME
                        PRID for the AutoML user
  --input-data INPUT_DATA
                        Name of the input file[s]. For multiple files use '*' in wildcard expression
  --input-smiles-csv-column INPUT_SMILES_CSV_COLUMN
                        Column name of SMILES column in csv file
  --input-activity-csv-column INPUT_ACTIVITY_CSV_COLUMN
                        Column name of activity column in data file
  --input-task-csv-column INPUT_TASK_CSV_COLUMN
                        Column name of task column in data file
  --input-initial-template INPUT_INITIAL_TEMPLATE
  --input-retrain-template INPUT_RETRAIN_TEMPLATE
  --input-slurm-template INPUT_SLURM_TEMPLATE
  --slurm-al-pool SLURM_AL_POOL
  --slurm-al-smiles-csv-column SLURM_AL_SMILES_CSV_COLUMN
  --slurm-job-prefix SLURM_JOB_PREFIX
An example of how to run this would be:
qsartuna-automl  --input-data "tests/data/automl/*"  --email <email>.com  --user_name <user_name> \
 --input-smiles-csv-column canonical  --input-activity-csv-column molwt --input-task-csv-column one_taskid  \
 --input-initial-template examples/automl/config.initial.template  \
 --input-retrain-template examples/automl/config.retrain.template  \
 --input-slurm-template examples/slurm-scripts/automl.template  \
 --n-cores 1 -vvv --slurm-al-pool tests/data/DRD2/subset-50/train.csv  \
 --slurm-al-smiles-csv-column canonical  --output-path ./test_auto1 --slurm-failure-max-cpu 220 \
 --slurm-job-prefix testaml --slurm-req-partition testpartition \
 --save-previous-models
More information regarding the AutoML process is available in the QSARtuna notebook.
Adding descriptors to QSARtuna
1.) Add the descriptor code to the optunaz.descriptor.py file like so:
@dataclass
class YourNewDescriptor(RdkitDescriptor):
    """YOUR DESCRIPTION GOES HERE"""

    @apischema.type_name("YourNewDescriptorParams")
    @dataclass
    class Parameters:
        # Any parameters to pass to your descriptor here
        exampleOfAParameter: Annotated[
            int,
            schema(
                min=1,
                title="exampleOfAParameter",
                description="This is an example int parameter.",
            ),
        ] = field(
            default=1,
        )

    name: Literal["YourNewDescriptor"]
    parameters: Parameters

    def calculate_from_smi(self, smi: str):
        # Insert your code to calculate from SMILES here
        fp = code_to_calculate_fp(smi)
        return fp
Add the descriptor to the list within the same file here:
AnyUnscaledDescriptor = Union[
    Avalon,
    ECFP,
    ECFP_counts,
    PathFP,
    AmorProtDescriptors,
    MACCS_keys,
    PrecomputedDescriptorFromFile,
    UnscaledMAPC,
    UnscaledPhyschemDescriptors,
    UnscaledJazzyDescriptors,
    UnscaledZScalesDescriptors,
    YourNewDescriptor, #Ensure your new descriptor added here
]
and here:
CompositeCompatibleDescriptor = Union[
    AnyUnscaledDescriptor,
    ScaledDescriptor,
    MAPC,
    PhyschemDescriptors,
    JazzyDescriptors,
    ZScalesDescriptors,
    YourNewDescriptor, #Ensure your new descriptor added here
]
3.) You can now use YourNewDescriptor inside your Notebook:
from qsartuna.descriptors import YourNewDescriptor

config = OptimizationConfig(
    data=Dataset(
        input_column="canonical",
        response_column="molwt",
        training_dataset_file="tests/data/DRD2/subset-50/train.csv",
    ),
    descriptors=[YourNewDescriptor.new()],
    algorithms=[
        SVR.new(),
    ],
    settings=OptimizationConfig.Settings(
        mode=ModelMode.REGRESSION,
        cross_validation=3,
        n_trials=100,
        direction=OptimizationDirection.MAXIMIZATION,
    ),
)
or in a new config:
{
  "task": "optimization",
  "data": {
    "training_dataset_file": "tests/data/DRD2/subset-50/train.csv",
    "input_column": "canonical",
    "response_column": "molwt"
  },
  "settings": {
    "mode": "regression",
    "cross_validation": 5,
    "direction": "maximize",
    "n_trials": 100,
    "n_startup_trials": 30
  },
  "descriptors": [
    {
      "name": "YourNewDescriptor",
      "parameters": {
        "exampleOfAParameter": 3
      }
    }
  ],
  "algorithms": [
    {
      "name": "RandomForestRegressor",
      "parameters": {
        "max_depth": {"low": 2, "high": 32},
        "n_estimators": {"low": 10, "high": 250},
        "max_features": ["auto"]
      }
    }
  ]
}
Adding machine learning algorithms to QSARtuna
NB: CustomClassificationModel and CustomRegressionModel algorithm options are now available to allow customised algorithms within QSARtuna (see tutorial for details). This new feature is experimental and should be used with caution
1.) (Optional) consider adding .py algorithm code to the optunaz/algorithms/ directory, so this can be imported later
2.) Add the algorithm to optunaz.config.optconfig.py. For example, create a class among the existing algorithms like so:
@dataclass
class YourAlgorithm(Algorithm):
    """Your description goes here
    """

    @type_name("YourAlgorithmParams")
    @dataclass
    class Parameters:
        @dataclass
        class YourAlgorithmParameterInt:
            low: int = field(default=1, metadata=schema(title="low", min=1))
            high: int = field(default=100, metadata=schema(title="high", min=1))
        @dataclass
        class YourAlgorithmParameterFloat:
            low: float = field(default=1.0, metadata=schema(title="low", min=0.0001))
            high: float = field(default=2.0, metadata=schema(title="high", min=0.001))

        parameter_int: Annotated[
            YourAlgorithmParameterInt,
            schema(
                title="example int",
                description="Example int description",
            ),
        ] = YourAlgorithmParameterInt()

        parameter_float: Annotated[
            YourAlgorithmParameterFloat,
            schema(
                title="example float",
                description="Example float description",
            ),
        ] = YourAlgorithmParameterFloat()

        fixed_int: Annotated[
            int,
            schema(
                min=10,
                max=100,
                title="Example of a priori fixed int",
                description="Example set at runtime (not optimised)",
            ),
        ] = field(default=10)

    name: Literal["YourAlgorithm"]
    parameters: Parameters
N.B: Ensure defaults for low/high and min/max make sense for your algorithm. Refer to Optuna documentation for details.
In the same file, add the algorithm here:
AnyRegressionAlgorithm = Union[
    YourAlgorithm, #If your algorithm is a regressor
    Lasso,
    PLSRegression,
    RandomForestRegressor,
    Ridge,
    KNeighborsRegressor,
    SVR,
    XGBRegressor,
    PRFClassifier,
    ChemPropRegressor,
    ChemPropRegressorPretrained,
    ChemPropHyperoptRegressor,
]
or here:
AnyClassificationAlgorithm = Union[
    YourAlgorithm, #If your algorithm is a regressor
    AdaBoostClassifier,
    KNeighborsClassifier,
    LogisticRegression,
    RandomForestClassifier,
    SVC,
    ChemPropClassifier,
    ChemPropHyperoptClassifier,
]
depending on if it is a classifier or regressor.
3.) Add the algorithm to optunaz.config.buildconfig.py, creating a new class among the existing, like so:
@dataclass
class YourAlgorithm(Algorithm):
    @dataclass
    class YourAlgorithmParameters:
        parameter_int: int = field(metadata=schema(min=1))  #ensure metadata is consistent with your optconfig.py
        parameter_float: float = field(metadata=schema(min=0.0001))
        fixed_int: int = field(metadata=schema(min=10))

    name: Literal["YourAlgorithm"]
    parameters: YourAlgorithmParameters

    def estimator(self):
        return youralgorihtm.ExampleAlgorithm(
            parameter_int=self.parameters.parameter_int,
            parameter_float=self.parameters.parameter_float,
            fixed_int=self.parameters.fixed_int,
        )
N.B: Ensure parameters are as expected from your optconfig.py class from Step 2.
N.N.B: If required, import your .py script (ExampleAlgorithm from youralgorihtm.py in this example)
4.) Add the algorithm to optunaz.config.build_from_opt.py, within the list of elif statements, like so:
    elif isinstance(alg, opt.YourAlgorithm):
        parameter_int = trial.suggest_int(
            name=_encode_name("parameter_int"), # Ensure your parameter name is encoded within the string here
            low=para.parameter_int.low,
            high=para.parameter_int.high,
        )
        parameter_float = trial.suggest_float(
            name=_encode_name("parameter_float"), # Ensure your parameter name is encoded within the string here
            low=para.parameter_float.low,
            high=para.parameter_float.high,
        )
        fixed_int = trial.suggest_int( # It is useful to suggest fixed parameters for tracking/reporting even if not optimised
            name=_encode_name("fixed_int"),
            low=para.fixed_int,
            high=para.fixed_int, # low & high should be set to the same for fixed at runtime parameters
        )
        return build.YourAlgorithm.new(
            parameter_int=parameter_int,
            parameter_float=parameter_float,
            fixed_int=fixed_int
        )
5.) You can use YourAlgorithm inside your Notebook:
from optunaz.config.optconfig import YourAlgorithm

config = OptimizationConfig(
    data=Dataset(
        input_column="canonical",
        response_column="molwt",
        training_dataset_file="tests/data/DRD2/subset-50/train.csv",
    ),
    descriptors=[YourNewDescriptor.new()],
    algorithms=[
        YourAlgorithm.new(fixed_int=100), # You can pass fixed parameters at instantiation
    ],
    settings=OptimizationConfig.Settings(
        mode=ModelMode.REGRESSION,
        cross_validation=3,
        n_trials=100,
        direction=OptimizationDirection.MAXIMIZATION,
    ),
)
or in a new config:
{
  "task": "optimization",
  "data": {
    "training_dataset_file": "tests/data/DRD2/subset-50/train.csv",
    "input_column": "canonical",
    "response_column": "molwt"
  },
  "settings": {
    "mode": "regression",
    "cross_validation": 5,
    "direction": "maximize",
    "n_trials": 100,
    "n_startup_trials": 30
  },
  "descriptors": [
    {
      "name": "YourNewDescriptor",
      "parameters": {
        "exampleOfAParameter": 3
      }
    }
  ],
  "algorithms": [
    {
      "name": "YourAlgorithm",
      "parameters": {
        "parameter_int": {"low": 10, "high": 50},
        "parameter_float": {"low": 1.2, "high": 1.8},
        "fixed_int": 100
      }
    }
  ]
}


## Converting models to QSARtuna models

QSARtuna has a CLI helper to convert models to QSARtuna models

We can perform this with the following command:

```shell
  qsartuna-convert \
  --input-model-file {project_folder}/sklearn_model.pkl\
  --input-model-mode regression \
  --output-model-path {project_folder}/qsartuna.pkl \
The convert CLI tool accepts the following command line arguments:
shell
qsartuna-convert -h
usage: qsartuna-convert [-h] --input-model-file INPUT_MODEL_FILE --input-model-mode INPUT_MODEL_MODE --output-model-path OUTPUT_MODEL_PATH [--input-json-descriptor-file INPUT_JSON_DESCRIPTOR_FILE] [--wrap-for-uncertainty]

Convert an existing sklearn(-like) model into a QSARtuna model

options:
  -h, --help            show this help message and exit
  --input-json-descriptor-file INPUT_JSON_DESCRIPTOR_FILE
                        Name of input JSON file with descriptor configuration. Defaults to PrecomputedDescriptorFromFile
  --wrap-for-uncertainty
                        Whether to wrap regression in MAPIE or classification in VennAbers Calibrated Classifiers for uncertainty support

required named arguments:
  --input-model-file INPUT_MODEL_FILE
                        Model file name.
  --input-model-mode INPUT_MODEL_MODE
                        Classification or regression mode for the existing model.
  --output-model-path OUTPUT_MODEL_PATH
                        Path where to write the converted model.
Advanced options for the QSARtuna convert CLI tool are covered in the QSARtuna Notebook tutorial